I submitted 20 cards to PSA during my first grading submission without pre-grading them properly. I paid quite a bit in grading fees expecting mostly 9s and 10s based on my amateur eyeball assessment. When they returned, I’d received eight PSA 8s, ten PSA 7s, and only two PSA 9s – no 10s whatsoever. That expensive mistake taught me that what looks mint to the naked eye often reveals significant flaws under proper magnification and lighting.
Pre-grade cards at home isn’t just about setting realistic expectations, it’s about saving hundreds or thousands of dollars by avoiding submissions of cards that won’t grade high enough to justify the cost. With PSA charging $25-100+ per card depending on service level, submitting a card that comes back as a 7 when you need an 8 to break even is pure financial loss.
In this guide, I’ll walk you through exactly which tools you need to pre-grade cards at home like a professional, how to use them effectively, and which investments provide the best value. Whether you’re preparing your first submission or trying to improve your pre-grading accuracy, these tools will transform how you assess card condition.
Why Should You Pre-Grade Cards Before Submission?

Before diving into specific tools, let’s establish why pre-grading matters and what you’re trying to accomplish. Understanding the stakes will help you appreciate why investing in proper tools pays for itself quickly.
Cost savings are enormous. PSA Express service costs $100 per card with 10-day turnaround. If you submit 10 cards expecting PSA 10s but receive five PSA 8s, you’ve spent $1,000 on submissions that might not cover grading costs when sold. A $200 investment in pre-grading tools could have identified those five questionable cards before submission, saving you $500 net.
I track my submission results meticulously. Before investing in proper pre-grading tools, my PSA 10 hit rate was roughly 15%, meaning 85% of my submissions didn’t achieve the grade I hoped for. After mastering pre-grading with proper equipment, my PSA 10 rate jumped to 45%, with most remaining cards grading PSA 9. This dramatic improvement came entirely from better card selection, not luck.
Realistic expectations prevent disappointment. There’s psychological value in knowing what grade to expect. When I submit a card I’ve pre-graded as PSA 9-calibre, receiving a PSA 9 feels satisfying. When I submitted cards blindly and received grades lower than my unrealistic hopes, it felt devastating even though the card graded accurately.
Submission strategy improves dramatically. Proper pre-grading helps you make intelligent decisions about which cards justify premium grading services versus standard services, which cards are better sold raw, and which cards you should hold hoping they’ll be re-evaluated favourably in future submissions.
I now categorise cards into tiers:
- Definite PSA 10 candidates: Submit via Express or Walkthrough service
- Strong PSA 9 candidates: Submit via Regular service
- PSA 8 or lower: Sell raw or keep raw in collection
This tiered approach maximises return on investment by matching submission cost to expected grade outcomes.
According to Card Capsule’s grading preparation guide, understanding the grading criteria is foundational, as each company uses specific standards for centering, corners, edges, and surface. Conducting a pre-assessment allows you to set realistic expectations for grading outcomes.
What Magnification Loupe Do You Need for Card Inspection?

A quality magnifying loupe is the single most important tool for pre-grading, and the magnification level you choose matters enormously.
10x magnification is the minimum effective power for card inspection. A 10x magnification is generally sufficient for most collectors, allowing you to examine edges, corners, and surface imperfections clearly. This level reveals scratches, print lines, and corner wear that’s invisible to naked eyes.
I started with a cheap loupe from Amazon that claimed 10x magnification. It technically worked, but the distorted optics and poor lens quality made accurate assessments difficult. After three months of mediocre results, I upgraded to a quality jeweler’s loupe and immediately noticed the difference in clarity.
30x magnification is preferred by serious graders and most commonly recommended for card inspection. Professional grading companies use 10x magnification during evaluation, but using 30x at home provides additional margin. If you can’t see flaws at 30x, they’re unlikely to affect grading outcomes. CSG uses a 10x magnification process to inspect the surface, edges, centres and corners, so 30x provides more than adequate detection capability.
A generic10x Card Magnifier represents excellent entry-level quality with proper optical clarity for accurate assessment. I recommend this for collectors just starting pre-grading.
For more serious collectors, the 30x illuminated jeweler’s loupe provides higher magnification with built-in LED lighting. These pocket-sized tools are portable enough to bring to card shows, making them invaluable for on-the-spot condition assessment before purchasing.
LED magnifying lamps offer hands-free magnification with adjustable arms and built-in lighting. These are ideal for workspace setups where you’re pre-grading multiple cards in sessions. The hands-free aspect lets you manipulate cards whilst maintaining magnified views, significantly improving inspection efficiency.
I use both a 30x handheld loupe for quick spot-checks and an LED magnifying lamp for detailed pre-grading sessions. The combination covers all scenarios, portable convenience and stationary precision.
What to look for in loupes:
Glass optics, not plastic: Glass lenses provide superior clarity and durability. Cheap plastic loupes distort images and scratch easily.
Achromatic or triplet construction: Quality loupes use multiple lens elements to eliminate chromatic aberration (colour fringing), providing accurate colour representation crucial for detecting print defects.
Built-in lighting: LED-illuminated loupes ensure consistent lighting regardless of ambient conditions. I’ve found this feature invaluable when inspecting cards in dimly lit spaces.
Magnification accuracy: Cheap loupes often exaggerate magnification claims. A “40x” loupe from an unknown brand might actually deliver 15-20x. Stick with reputable brands that accurately specify magnification.
How Do You Check Card Centering at Home?

Centering is one of the four core grading criteria and one of the easiest to assess accurately at home with proper tools.
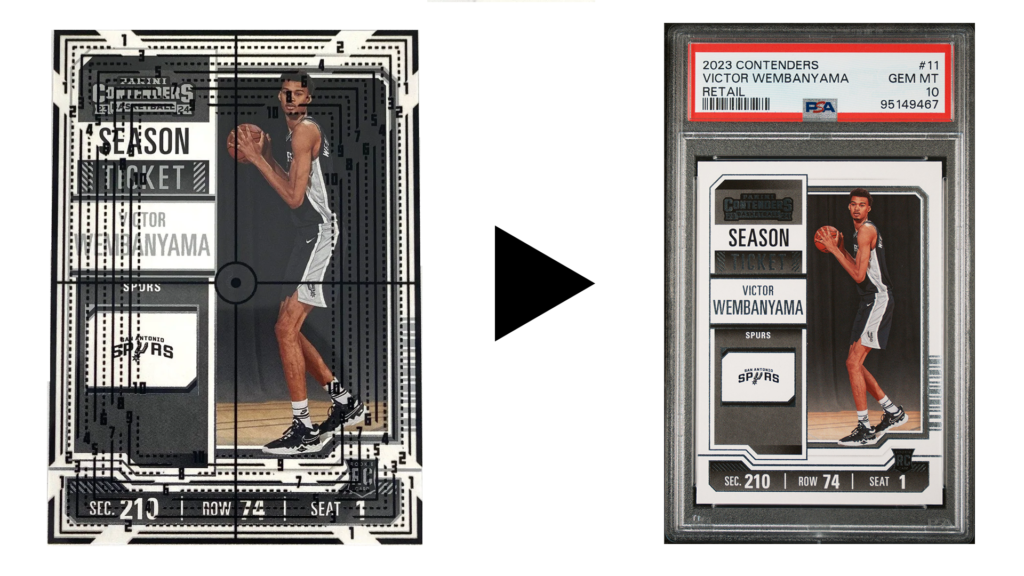
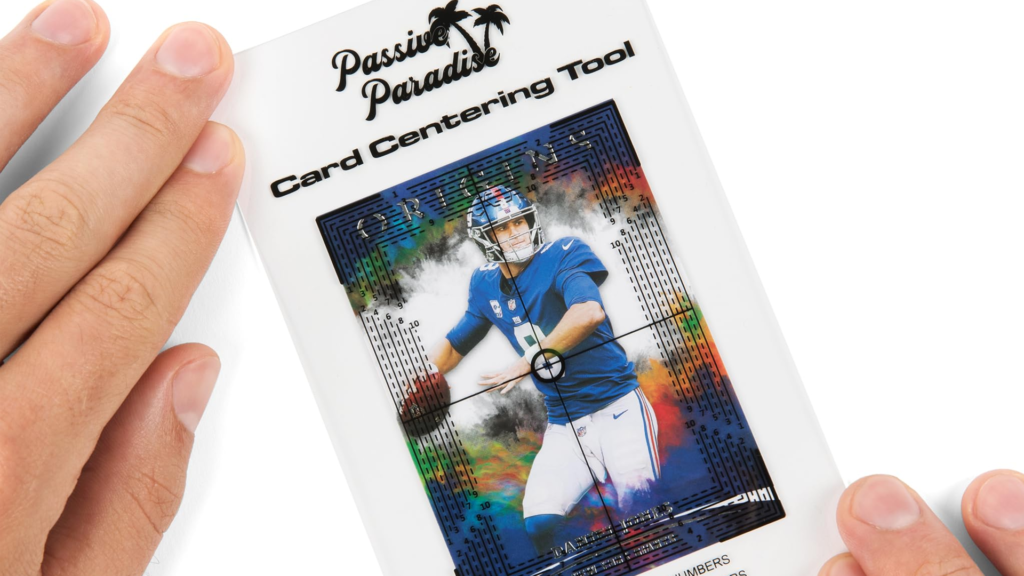
Dedicated centering tools provide the most accurate measurements. These acrylic templates feature printed gridlines that overlay your card, allowing precise measurement of border widths. The tool is used to help determine whether the sports cards are centred and delivers you a centering percentage.
The most popular centering tools feature percentage scales that directly translate measurements into PSA-friendly centering ratios. For PSA 10, you need 60/40 or better centering on front and back (as of February 2025, PSA updated standards to 55/45 for PSA 10). For PSA 9, 70/30 or better is typically required.
Passive Paradise Card Grading Centering Tool or the Legends Card Grading Centering Tool is the most commonly recommended entry-level option. The tool has been thoughtfully crafted with a focus on simplicity and user-friendliness, ensuring anyone can use it with comprehensive step-by-step instructions.
I bought one three years ago and still use it for every pre-grading session. The clear acrylic window fits standard trading cards perfectly, and the percentage guide eliminates guesswork about whether centering meets grade thresholds.
How to use centering tools:
- Place your card face-up on a flat, well-lit surface
- Position the centering tool over the card, aligning the card within the clear window
- Measure the left border width using the percentage scale
- Measure the right border width using the percentage scale
- Calculate the ratio (smaller border ÷ larger border)
- Repeat for top and bottom borders
- Check the back using the same process
For example, if your left border measures 2mm and right border measures 3mm, your centering is 2/3 = 66.7%, which qualifies for PSA 9 (requires 70/30 or better) but not PSA 10 (requires 60/40 or better).
DIY measurement alternatives:
Digital calipers provide precise border measurements in millimetres. Whilst more versatile than dedicated centering tools, they require manual calculation of ratios.
I use digital calipers for cards with unusual borders or non-standard dimensions where dedicated centering tools don’t fit properly. For standard trading cards, the dedicated tools are faster and easier.
Ruler measurement works but requires careful calculation and is prone to human error. I only use rulers when I don’t have access to my proper tools.
Important centering considerations:
Check both front and back. A card perfectly centred on front might be significantly off-centre on back. PSA evaluates both sides, so failing centering on either side limits the maximum grade achievable.
Vintage cards have looser standards. Pre-1980 cards often receive 70/30 or worse centering with PSA 9 grades because manufacturing tolerances were less precise. Modern cards (1990s+) are held to stricter standards.
Border variations matter. Cards with very thin borders (like many modern Chrome cards) show centering issues more prominently than cards with wide borders. A 65/35 centering ratio looks significantly off-centre on thin-border cards.
What Lighting Equipment Helps Identify Card Flaws?
Proper lighting is absolutely critical for accurate pre-grading, and ambient room lighting is rarely sufficient for revealing subtle defects.
Natural daylight remains the gold standard for card inspection. Position yourself near a window with indirect natural light for the most accurate colour representation and surface examination. Direct sunlight is too harsh and creates glare, but diffused window light is perfect.
I pre-grade cards at home with my desk positioned perpendicular to a large window. The indirect natural light reveals surface imperfections beautifully without harsh shadows or glare.
LED desk lamps with adjustable colour temperature provide consistent artificial lighting when natural light isn’t available. Look for lamps rated 5000K-6500K (daylight spectrum) for accurate colour representation.
I use a Daylight LED Desk Lamp specifically designed for crafts and inspection work. The 6000K colour temperature closely matches natural daylight, and the adjustable arm lets me position light at optimal angles for revealing surface imperfections.
LED light boxes create backlit environments that reveal certain defects more easily than direct lighting. These are particularly useful for detecting:
- Print lines and registration issues
- Uneven card stock thickness
- Manufacturing defects
- Wax staining on vintage cards
Whilst not essential for beginners, serious graders find light boxes invaluable for difficult assessments.
The raking light technique:
Hold a small LED flashlight at a very low angle (nearly parallel to the card surface) and slowly move it across the card. This “raking light” technique reveals:
- Surface indentations invisible under normal lighting
- Subtle scratches
- Print layer irregularities
- Surface texture variations
I discovered this technique from professional graders and now use it on every card I’m considering for PSA 10 submission. Surface imperfections that looked invisible under normal lighting become glaringly obvious under raking light.
Lighting setup recommendations:
Primary light: Natural window light or 6000K LED desk lamp positioned above and slightly in front of the card
Secondary light: Small LED flashlight for raking light inspection
Background: White or light grey surface provides neutral backdrop that doesn’t interfere with colour assessment
Avoid coloured surfaces, dark rooms, or inconsistent lighting—these create conditions where you’ll miss defects that grading companies will catch.
Do You Need a Blacklight for Card Authentication?
Blacklights (UV lights) serve specific purposes in card collecting and are valuable tools for certain situations, though not essential for basic pre-grading.
UV lights reveal:
Card stock authenticity: Genuine vintage card stock often fluoresces differently under UV light compared to modern reproductions. This helps identify counterfeits, reprints, and alterations.
Alterations and trimming: Trimmed edges often show different fluorescence patterns than factory edges under UV examination.
Surface treatments: Some restoration attempts (cleaning chemicals, surface coating) become visible under blacklight.
Security features: Some modern cards include UV-reactive security features that verify authenticity.
I bought one specifically for authenticating vintage purchases at card shows. Being able to quickly check cards under UV before purchasing has saved me from buying at least two counterfeit vintage cards that looked convincing under normal light.
When blacklights matter most:
Vintage card collecting: Pre-1980 cards, especially high-value rookies, face significant counterfeiting. UV verification is crucial for expensive vintage purchases.
Modern counterfeits: Certain modern cards (particularly valuable rookies and limited prints) are counterfeited. UV helps identify fakes.
Grading submissions: If you’re submitting cards worth $1,000+, UV verification ensures you’re not wasting grading fees on counterfeits.
When blacklights are less critical:
Modern mass-produced cards: Recent base cards from major sets rarely face counterfeiting—verification isn’t necessary.
Personal collection cards: If you pulled cards yourself from sealed packs, authenticity isn’t questioned.
Low-value submissions: Cards worth under $100 rarely justify the time investment of UV verification.
My recommendation: casual collectors pre-grading common modern cards don’t need blacklights. Serious collectors dealing with vintage cards, high-value modern cards, or making significant purchases should absolutely invest in UV capability.
How Do You Properly Inspect Card Corners?
Corners are one of the most scrutinised grading criteria and one of the hardest to assess accurately without proper technique and tools.
What graders look for in corners:
Sharpness: PSA 10 corners must be perfectly sharp with no rounding whatsoever. Even microscopic rounding disqualifies PSA 10 status.
Whitening: Any white showing on corners from paper layer exposure indicates wear. This is instantly visible under magnification.
Fraying: Corner edges should be crisp with no frayed paper fibres extending beyond the corner point.
Dings: Impact damage creating small indentations or bent corners immediately limits grades.
Proper corner inspection technique:
- Use 30x magnification loupe with illumination
- Examine each corner individually, starting with top-left and working clockwise
- Rotate the card slowly whilst maintaining magnified view—corner defects become obvious when light catches them at different angles
- Check both front and back of each corner
- Compare all four corners against each other—inconsistency indicates issues
I spend 30-60 seconds per card just examining corners during pre-grading. Corners are vital, as they are prone to wear, and even the smallest rounding or fraying can significantly lower a card’s grade.
Common corner issues:
Factory corners: Some cards leave the factory with slightly soft corners due to manufacturing imperfections. These cards will never grade PSA 10 regardless of how carefully you’ve stored them.
I’ve had cards I pulled fresh from packs that showed microscopic corner rounding under 30x magnification. These went directly into my personal collection rather than grading submissions.
Handling damage: Corner damage from insertion into sleeves, removal from top loaders, or general handling is extremely common. This is why proper handling technique matters so much.
Storage wear: Even cards stored carefully can develop corner issues if top loaders have rough interior edges or if cards shift during storage.
The corner touch test: Gently run your fingernail along each corner edge. Sharp corners feel distinct and well-defined. Rounded corners feel smooth and less defined. This tactile assessment complements visual inspection.
What Tools Help Examine Card Surfaces?
Surface examination represents perhaps the most challenging aspect of pre-grading because surface defects range from obvious (large scratches) to nearly invisible (microscopic print lines).
Surface defects that affect grades:
Scratches: Any visible scratching, particularly on glossy or refractor surfaces, limits grades significantly. Under magnification, even hairline scratches become obvious.
Print lines: Thin lines in the print layer caused by manufacturing issues. These are factory defects but still affect grades.
Print dots or spots: Small dots or colour variations in the printed image.
Indentations: Depressions in the card surface from impact or pressure.
Surface wrinkling: Micro-wrinkles in the card stock, often from humidity damage.
Wax staining: Common on vintage cards, appears as oily-looking spots.
The surface inspection process:
Start with the card in a penny sleeve under good lighting. This protects the card whilst allowing initial visual inspection.
Remove the card carefully using cotton gloves to prevent fingerprint transfer during examination.
Examine the surface under 10x-30x magnification in a grid pattern—top third, middle third, bottom third—ensuring complete coverage.
Use raking light technique with a small LED flashlight held at extreme angles to reveal subtle surface irregularities.
Check glossy surfaces particularly carefully. Refractors, Chrome finishes, and high-gloss cards show surface imperfections more readily than matte surfaces.
Flip the card and examine the back using the same process. Back surface condition affects grading just as much as front.
Tools specifically for surface examination:
LED magnifier with adjustable brightness: Allows you to fine-tune lighting for optimal defect visibility. The LED multi-function tool features adjustable brightness + 30x magnification for detecting scratches/print lines.
Microfibre cleaning cloths: Remove dust and fingerprints before examination. Dust particles can be mistaken for surface defects if not cleaned first.
Cotton gloves: Prevent oil transfer from fingers during handling. Latex gloves prevent fingerprint marks and eliminate skin oils.
I keep a stack of microfibre cloths at my workstation and clean every card before magnified inspection. What looked like surface imperfections often turn out to be dust particles that wipe away harmlessly.
Distinguishing print lines from scratches:
Print lines are part of the printed ink layer and appear uniform in depth and colour. They typically run in consistent directions (vertical or horizontal) and can’t be felt with your fingernail.
Scratches penetrate into or through the print and protective layers. They often catch light differently from various angles and can sometimes be felt tactilely.
Learning to distinguish between these takes practice, but it’s crucial—print lines are factory defects that definitely affect grades, whilst scratches indicate post-production damage.
Should You Buy a Complete Card Grading Kit?
Multiple manufacturers sell complete pre-grading kits bundling all essential tools in one package. The question is whether these kits provide good value compared to buying tools individually.
What’s typically included in grading kits:
Most comprehensive kits include one card centering tool, one centering guide card, one 30x magnifying loupe, one LED magnifying table lamp, 100 penny sleeves, 25 top loader card holders, microfibre cleaning cloth, white cotton gloves, and batteries.
Popular grading kit options:
Budget kits ($25-40): Basic centering tool, 30x loupe, microfibre cloth, and gloves. Missing LED lighting and protective supplies.
Mid-range kits ($50-80): Add LED magnifying lamp, larger supply of sleeves and top loaders, sometimes includes semi-rigid card savers.
Premium kits ($80-120): Include everything from mid-range plus thickness gauge, multiple loupes, blacklight capability, and upgraded storage cases.
I tested three different grading kits when I started taking pre-grading seriously, trying to determine which provided best value.
The 2025 Sports Cards Grading Kit stood out with its lab-grade inspection tools, PSA standard certified centering tool ensuring 100% compliance with PSA’s updated 55/45 centering ratio, dual magnification system with adjustable brightness LED magnifier and 30x portable loupe, plus thickness gauge.
This kit saved me hours of research and ensured compatibility across all tools. Everything works together properly, the centering tool matches current PSA standards, the magnification levels are appropriate, and the supplementary items (gloves, cloths) are actually useful rather than cheap throw-ins.
Pros of buying kits:
Convenience: One purchase gets you everything needed to start pre-grading immediately.
Compatibility: Tools are designed to work together rather than cobbling together items from different manufacturers.
Cost savings: Kits typically cost 20-30% less than buying equivalent tools individually.
Beginner-friendly: No need to research which tools you need—kits include essentials.
Cons of buying kits:
Potential for low-quality components: Some kits include cheap tools to hit price points.
Unnecessary items: You might not need everything included (like 100 penny sleeves if you already have supplies).
Limited customisation: Can’t choose specific brands or features you prefer.
My recommendation:
For beginners just starting pre-grading: Buy a mid-range complete kit ($50-80). You’ll get everything needed to learn pre-grading without overspending on premium tools you’re not ready for.
For experienced collectors upgrading tools: Buy individual premium pieces rather than kits. You likely already have some tools and want to upgrade specific items.
For serious graders submitting regularly: Invest in premium individual tools matching your specific needs.
I started with a budget kit, graduated to a mid-range kit after six months, and now use mostly individual premium tools I’ve accumulated over time. This progression worked well as I learnt on affordable tools before investing in expensive equipment.
How Close Can Home Pre-Grading Match Professional Grades?
This is the million-dollar question that every pre-grader wants answered: how accurately can you predict professional grades using home tools?
Realistic accuracy expectations:
Centering: 95%+ accuracy is achievable. Centering is objective and measurable if you can match professional assessments nearly perfectly with proper tools.
Corners: 70-80% accuracy is typical for experienced graders. Corner assessment requires significant skill development and even experts miss subtle issues.
Edges: 75-85% accuracy for experienced graders. Edge assessment is easier than corners but still requires careful technique.
Surface: 60-70% accuracy even for skilled graders. Surface defects are the hardest to assess accurately—microscopic issues invisible even under 30x magnification can affect professional grades.
Overall grade prediction: 60-75% exact match rate for experienced pre-graders. This means 60-75% of your predictions will exactly match the professional grade, whilst the remainder will be within one grade point.
My personal tracking shows I exactly match PSA grades on roughly 68% of submissions, come within one grade point on 28% of submissions, and miss by two or more grade points on only 4% of submissions. This accuracy level saves me enormous money by preventing bad submissions.
Common discrepancies between home pre-grades and professional grades:
Surface defects you missed: The most common reason for lower-than-expected grades. Professional graders use industrial-grade lighting and magnification that reveal defects invisible with home equipment.
Subjective centering calls: Near-threshold centering (like 59/41 vs. 60/40) can go either way depending on how the grader measures.
Corner standards: What looks sharp to you under 30x might show microscopic rounding under professional equipment.
Back-of-card issues: It’s easy to focus heavily on card fronts whilst giving backs cursory inspection. PSA evaluates both equally.
Skill development timeline:
Months 1-3: Expect 40-50% accuracy. You’re learning what to look for and how to use tools properly.
Months 4-6: Accuracy improves to 55-65% as you develop pattern recognition for defects.
Months 7-12: Reach 65-70% accuracy as your skills mature and you learn from returned grades.
Year 2+: Achieve 70-75% accuracy, the practical ceiling for home pre-grading.
I maintain a spreadsheet tracking every card I submit: my pre-grade prediction, actual PSA grade received, and notes on what I missed. Reviewing this data quarterly has dramatically improved my accuracy by identifying patterns in my mistakes.
According to the Break Stuff AI grading guide, recording your grading predictions for each card you elect to send out for grading and comparing them once returned helps improve accuracy. Completing this task multiple times before sending in bulk ensures your pre-grade cards at home matches received grades.
What’s the Best Workspace Setup for Card Pre-Grading?
Having the right tools matters, but how you arrange your workspace significantly affects pre-grading efficiency and accuracy.
Optimal lighting setup:
Primary light source: Position near a window for natural daylight (indirect), or use a 6000K LED desk lamp positioned 12-18 inches above your work surface at a 45-degree angle.
Secondary light: LED magnifying lamp with adjustable arm for detail work.
Ambient lighting: Soft overhead lighting to prevent eye strain without creating harsh shadows.
Background: White or light grey mat providing neutral backdrop.
I use a large white cutting mat as my work surface. The neutral background prevents colour interference, and the smooth surface won’t scratch card backs if I accidentally set cards down outside penny sleeves.
Tool organisation:
Keep frequently-used tools within arm’s reach: centering tool, 30x loupe, microfibre cloths, cotton gloves, and penny sleeves should be immediately accessible.
Store protective supplies (top loaders, semi-rigid holders, team bags) in organised containers rather than scattered loose.
Maintain a “dirty” and “clean” zone on your workspace. Cards awaiting inspection stay in the dirty zone, whilst cards you’ve examined go into the clean zone. This prevents re-examining the same cards accidentally.
Clean environment importance:
Work surface: Wipe down before each pre-grading session. Dust and debris can transfer to cards or be mistaken for card defects.
Hand washing: Wash hands thoroughly before handling cards, even when using gloves. Oils and contaminants on unwashed hands transfer through gloves over time.
Air quality: Avoid dusty or humid environments. Work in climate-controlled spaces when possible.
I keep my pre-grading workspace in a dedicated room with an air purifier running. This might seem excessive, but cards worth hundreds or thousands of dollars deserve this level of care.
Ergonomics:
Proper seating: Use a chair with good back support—pre-grading sessions can run 2-3 hours.
Work surface height: Position at comfortable height where you can maintain good posture whilst leaning slightly forward for magnified inspection.
Regular breaks: Take 10-minute breaks every hour to prevent eye strain and maintain focus.
Documentation station:
Keep a notepad or laptop nearby for recording observations: card identification, pre-grade assessment, specific issues noticed, and whether the card warrants submission.
I use a simple spreadsheet with columns for Card Description, Pre-Grade, Centering (F/B), Corners (1-10 scale), Edges (1-10 scale), Surface (1-10 scale), and Submit? (Yes/No). This documentation creates accountability and helps track accuracy over time.
Building Your Pre-Grading Toolkit
After years of pre-grading cards and refining my process, I’ve developed a clear framework for building an effective toolkit without wasting money on unnecessary items.
Essential tools (absolute minimum):
- 30x jeweler’s loupe with LED lighting
- Centering tool
- Microfibre cleaning cloths: Pack of 10
- Cotton gloves: Pack of multiple pairs
Total minimum investment: $50-70
This basic toolkit lets you pre-grade cards at home effectively, though you’ll lack convenience features like hands-free magnification and advanced inspection capabilities.
Recommended toolkit (serious collectors):
- Complete grading kit (mid-range)
- LED magnifying desk lamp
- Digital calipers
- Small LED flashlight
- White work mat
Total recommended investment: $120-180
This setup provides professional-grade pre-grading capability suitable for regular submissions and serious collecting.
Premium toolkit (frequent submitters):
- Premium grading kit or individual premium tools
- LED magnifying desk lamp
- UV/blacklight capability
- Light box
- Professional work surface setup
Total premium investment: $270-430
This represents the ceiling for home pre-grading equipment. Additional investment beyond this level yields diminishing returns.
Investment prioritisation:
First $75: Buy complete mid-range grading kit covering all essentials.
Next $50: Add LED desk lamp with 6000K colour temperature.
Next $40: Add UV capability for authentication if working with vintage or high-value cards.
Next $60: Add light box for advanced surface inspection.
Beyond $225: Only invest if you’re submitting 50+ cards quarterly and the improved accuracy directly impacts your financial returns.
I’ve spent roughly $350 on pre-grading equipment over three years, adding tools gradually as my submission volume and card values increased. This measured approach prevented overspending on tools I wasn’t ready to utilise effectively.
The return on investment is undeniable. My improved pre-grading accuracy has prevented at least $2,000 in wasted grading fees on cards that would have graded too low. The $350 tool investment paid for itself six times over.
Remember that tools are enablers, not magic bullets. A $200 toolkit won’t make you a pre-grading expert, but practice, experience, and diligent documentation of results create expertise. Start with basic tools, develop skills, and upgrade equipment as your proficiency increases.
What tools have you found most valuable for pre-grading? Have you made any tool purchases you regret, or discovered hidden gems that dramatically improved your accuracy? Drop a comment below and share your pre-grading toolkit recommendations, the community benefits when we share what actually works.